🥕SpringCloud实战分布式优惠券系列的第一篇,主要讲解SpringBoot中的一些高级特性🥕
SpringCloud 分布式优惠券(1)---SpringBoot相关
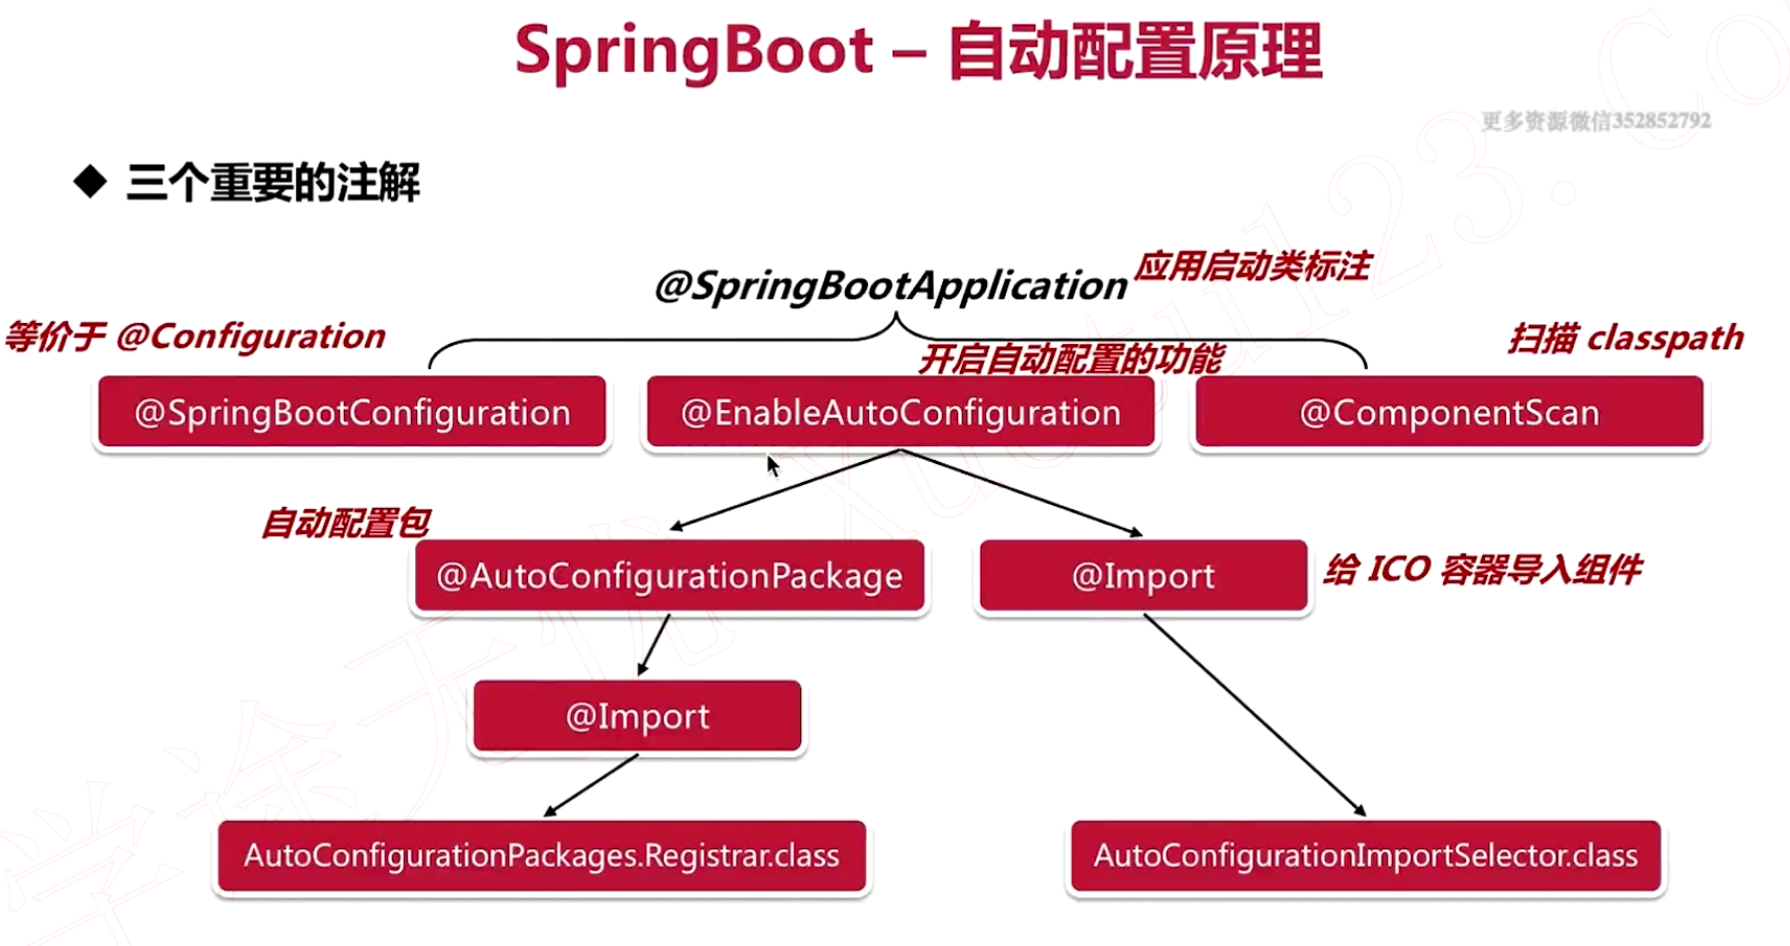
1. 自动装配原理
2. 配置文件
- 同一目录下的application和bootstrap
- bootstrap优先级高于application,优先被加载
- bootstrap用于应用程序上下文的引导阶段,由父ApplicationContext加载
- bootstrap是系统级别的配置(不变的参数),application是应用级别的配置
- 不同位置的配置文件加载顺序(优先级)
file: ./config/- 优先级最高(项目根路径下的config)file: ./- 优先级第二(项目根路径下)classpath: /config/- 优先级第三 (项目resources/config下)classpath: /- 优先级第四(项目resources目录下)
3. 配置注入
-
直接使用
@Value的形式@Value("${zth.springboot.version}") private String version -
需要在pom.xml中首先配置用于数据绑定的依赖
<dependency>
  <groupId>org.springframework.boot</groupId>
  <artifactId>spring-boot-configuration-processor</artifactId>
  <optional>true</optional>
</dependency>
applicaiton.yml配置文件如下
# application.yml
zth:
	springboot:
		version: 2.3.1
		name: study
新建一个配置类,需要注意的是配置类中的值需要和applicaiton.yml文件中一致
@Data
@Component
@ConfigurationProperties(prefix = "zth.springboot")
public class SpringBootConfig {
  private String version;
	private String name;
}
使用
@Autowired就可以注入SpringBootConfig了
4. 定时应用
-
需要在主配置上开启允许定时任务的注解
@EnableScheduling -
新建一个定时任务类
@Slf4j
@Component
public class BootSchedule {
  private final DateTimeFormatter fmt = DateTimeFormatter.ofPattern(
  	"HH:mm:ss"
  );
  // 上一次开始执行时间点之后3秒再执行
  @Scheduled(fixedRate = 3000)
  public void schedule01(){
    log.info("schedule01 -> {}", LocalDateTime.now().format(fmt));
  }
  // 第一次延迟2s之后执行
  // 上一次执行完毕时间点之后3秒再执行
  @Scheduled(initialDelay = 2000, fixedDelay = 3000)
  public void schedule02(){
    log.info("schedule02 -> {}", LocalDateTime.now().format(fmt));
  }

  // 每3s执行一次
  // 使用cron表达式的形式
  @Scheduled(cron = "*/3 * * * * ?")
  public void schedule04(){
    log.info("schedule02 -> {}", LocalDateTime.now().format(fmt));
  }
}
5. 异步任务
1. 异步方法
-
首先需要在pom.xml中添加springboot的web依赖
<dependency>
  <groupId>org.springframework.boot</groupId>
  <artifactId>spring-boot-starter-web</artifactId>
</dependency>
在启动类中开启异步的注释
@EnableAsync@EnableAsync @EnableScheduling @SpringBootApplication public class SpringBootStudyApplication{ public static void main(String[] args){ // ... } } -
新建一个异步处理服务
asyncService@Slf4j @Service public class AsyncService { @Async("getAsyncExecutor") public void asyncProcess() throws InterruptedException { log.info("async process task, current thread name -> {}", Thread.currentThread().getName()); TimeUnit.SECONDS.sleep(2); } @Async("getAsyncExecutor") public Future<Integer> asyncProcessHasReturn() throws InterruptedException { log.info("async process task(has return), current thread name -> {}", Thread.currentThread().getName()); TimeUnit.SECONDS.sleep(2); return new AsyncResult<>(100); } }
2. 自定义异步线程池
-
SpringBoot中自带的异步线程池中有问题 -
在
config目录中定义一个AsyncPoolConfig@Slf4j @Configuration public class AsyncPoolConfig implements AsyncConfigurer { @Bean @Override public Excutor getAsyncExecutor() { ThreadPoolTaskExcutor excutor = new ThreadPoolTaskExecutor(); excutor.setCorePoolSize(10); excutor.setMaxPoolSize(20); excutor.setQueueCapacity(20); excutor.setKeepAliveSeconds(60); excutor.setThreadNamePrefix("ZthAsync_"); excutor.setWaitForTasksToCompleteOnShutDown(true); excutor.setAwaitTerminationSeconds(60); // 拒绝策略 excutor.setRejectedExecutionHandler( new ThreadPoolExcutor.CallerRunsPolicy() ); excutor.initialize(); return excutor; } // 定义异步任务的异常处理类 @Override public AsyncUncaughtExceptionHandler getAsyncUncaughtExceptionHandler() { return new AsyncExceptionHandler(); } class AsyncExceptionHandler implements AsyncUncaughtExceptionHandler { @Override public void handleUncaughtException(Throwable throwable, Method method, Object... objects){ log.info("AsyncError: {}, Method: {}, Param: {}", throwable.getMessage(), method.getName(), JSON.toJSONString(objects)); throwable.printStackTrace(); // TODO 发送提示(邮件or短信) } } }
6. 单元测试
-
首先引入单元测试的
pom.xml配置<dependency> <groupId>org.springframework.boot</groupId> <artifactId>spring-boot-starter-test</artifactId> <scope>test</scope> </dependency> -
新建同名类路径,新建基础测试用例
@SpringBootTest @RunWith(SpringRunner.class) public class SpringBootStudyTests { @Test public void contextLoad(){ } } -
新建上述异步任务测试用例
@Slf4j
@SpringBootTest
@RunWith(SpringRunner.class)
public class AsyncServiceTest {
    @Autowired
    private AsyncService asyncService;
    @Test
    public void testAsyncProcess() throws InterruptedException {
        asyncService.asyncProcess();
        log.info("coming in testAsyncProcess...");
    }
    @Test
    public void testAsyncProcessHasReturn() throws Exception {
        long start = System.currentTimeMillis();
        Future<Integer> result = asyncService.asyncProcessHasReturn();
//        log.info("get async task value: {}", result.get());
        log.info("get async task value: {}",
                result.get(1, TimeUnit.SECONDS));
        log.info("time elapse for async task: {}ms",
                System.currentTimeMillis() - start);
    }
}
7. 开机启动任务
-
第一种方式:
ApplicationRunner@Order(2) @Slf4j @Component public class BootApplicationRunner implements ApplicationRunner { @Override public void run(ApplicationArguments args) throws Exception { log.info("This is BootApplicationRunner..."); } } -
第二种方式:
CommandLineRunner@Order(1) @Slf4j @Component public class BootCommandLineRunner implements CommandLineRunner { @Override public void run(String... args) throws Exception { log.info("This is BootCommandLineRunner..."); } } -
默认情况下
ApplicationRunner高于CommandLIineRunner
8. Jackson的使用
-
新建一个简单VO类
Coder// Coder.java @Data @NoArgsConstructor @AllArgsConstructor @Builder @JsonIgnoreProperties({ "address" }) public class Coder { private String name; private int age; // @JsonIgnore -> 使用打在类上面的JsonIgnore private String address; @JsonProperty("rt") @JsonFormat(pattern = "yyyy-MM-dd HH:mm:ss") private Date registerTime; } -
可以在
config目录下定义一个JacksonConfig类,用于对时间字段的序列化修饰@Configuration public class JacksonConfig { @Bean public ObjectMapper getObjectMapper() { ObjectMapper mapper = new ObjectMapper(); // 不序列化包含null的字段 mapper.setSerializationInclusion(JsonInclude.Include.NON_NULL); // format对象 mapper.setDateFormat(new SimpleDateFormat("yyyy-MM-dd HH:mm:ss")); return mapper; } } -
在controller中新建一个方法用来测试Jackson
// Controller.java
/**
* 127.0.0.1:8000/zth/springboot/jackson
**/
@GetMapping("/jackson")
public Imoocer jackson() throws Exception {
  Imoocer imoocer = Imoocer.builder()
    .name("zth")
    .age(19)
    .address("shanghai")
    .registerTime(new Date())
    .build();
  // 序列化
  String jsonImoocer = mapper.writeValueAsString(imoocer);
  log.info("imoocer jackson: {}", jsonImoocer);
  return mapper.readValue(jsonImoocer, Imoocer.class);
}
// 返回结果
{
  "name": "qinyi",
  "age": 23,
  "rt": "2020-05-12"
}
9. Acutator监控
1. 基本使用
-
Actuator是什么,能做什么?
- 是什么:是SpringBoot提供的对应用系统的自省和监控的集成功能
- 能做什么:查看应用(配置)信息、环境信息以及对应用进行监控
-
Actuator监控分类:
- 原生端点
- 应用配置类(运行时信息)
- 度量指标类(运行期的信息)
- 操作控制类(shutdown 默认不开启)
- 自定义端点
- 原生端点
-
添加pom.xml依赖
<dependency> <groupId>org.springframework.boot</groupId> <artifactId>spring-boot-starter-actuator</artifactId> </dependency> -
在application.yml中配置端点开启状况
management: endpoint: shutdown: enabled: true # 最特殊的监控端点 一般不开启 endpoints: web: exposure: include: "*" # 打开所有的监控点 []可以选择要打开哪些 -
请求
localhost:8000/zth/acuator/health端口{ "status": "UP" } -
在application.yml中配置info信息
info:
  app:
    name: zth-springboot-study
    groupId: com.zth.springboot.study
    version: 1.0-SNAPSHOT
请求
localhost:8000/zth/acuator/info端口,此时返回信息如下{ "app": { "name": "zth-springboot-study", "groupId": "com.zth.springboot.study", "version": "1.0-SNAPSHOT" } }
2. 常用选项和配置
-
应用配置类常用监控
- 自己配置的info信息:/actuator/info
- 应用中bean的信息:/actuator/beans
- 应用中URI路径信息:/actuator/mappings
-
度量指标类常用监控
- 检查应用的运行状态:/actuator/health
- 当前线程活动快照:/actuator/threaddump
-
操作控制类常用监控
-
关闭应用(POST):/actuator/shutdown
curl -x post "http://loccalhost:8000/actuator/shutdown"
-
3. 端点使用
-
新建一个文件夹endpoint,新建DateTimeEndPoint类
// DateTimeEndPoint.java /** * <h1>自定义事件端点</h1> */ @Endpoint(id = "datetime") public class DateTimeEndPoint { private String format = "yyyy-MM-dd HH:mm:ss"; // 用来显示监控指标 // zth/actuator/datetime @ReadOperation public Map<String, Object> info() { Map<String, Object> info = new HashMap<>(); info.put("name", "zth"); info.put("age", "23"); info.put("datetime", new SimpleDateFormat(format).format(new Date())); return info; } // 动态更改监控指标 @WriteOperation public void setFormat(String format) { this.format = format; } } -
在endpoint文件夹下新建自定义端点配置类DateTimeEndpointConfig
// DateTimeEndpointConfig.java // 自定义端点配置类 @Configuration public class DateTimeEndpointConfig { @Bean @ConditionalOnMissingBean @ConditionalOnEnabledEndpoint public DateTimeEndPoint dateTimeEndPoint() { return new DateTimeEndPoint(); } } -
在postman中使用GET请求
localhost:8000/zth/actuator/datetime{ "datetime": "2020-05-12 08:08:08", "name": "zth", "age": "23" }当使用POST请求
localhost:8000/zth/actuator/datetime时带如下请求体时{ "format": "yyyy-MM-dd" }无返回结果,再次使用GET请求访问
localhost:8000/zth/actuator/datetime,返回结果如下{ "datetime": "2020-05-12", "name": "zth", "age": "23" }
10. 自定义starter
1. 自定义starter项目准备
-
创建一个
springboot项目,groupId按照xxxx-spring-boot-starter的格式命名 -
添加pom.xml文件依赖
<?xml version="1.0" encoding="UTF-8"?> <project xmlns="http://maven.apache.org/POM/4.0.0" xmlns:xsi="http://www.w3.org/2001/XMLSchema-instance" xsi:schemaLocation="http://maven.apache.org/POM/4.0.0 http://maven.apache.org/xsd/maven-4.0.0.xsd"> <modelVersion>4.0.0</modelVersion> <groupId>com.zth.springboot</groupId> <artifactId>split-spring-boot-starter</artifactId> <version>1.0-SNAPSHOT</version> <packaging>jar</packaging> <parent> <groupId>org.springframework.boot</groupId> <artifactId>spring-boot-starters</artifactId> <version>2.1.4.RELEASE</version> </parent> <properties> <maven.compiler.source>1.8</maven.compiler.source> <maven.compiler.target>1.8</maven.compiler.target> </properties> <dependencies> <dependency> <groupId>org.springframework.boot</groupId> <artifactId>spring-boot-configuration-processor</artifactId> <optional>true</optional> </dependency> <dependency> <groupId>org.springframework.boot</groupId> <artifactId>spring-boot-autoconfigure</artifactId> </dependency> </dependencies> </project> -
新建service目录,service方法还有对应的实现类
// ISplitService.java
// 字符串分割服务接口定义
public interface ISplitService {
    List<String> split(String value);
}
对应的实现类
// SplitServiceImpl.java public class SplitServiceImpl implements ISplitService { @SuppressWarnings("all") @Override public List<String> split(String value) { // jdk1.8中的stream流 return Stream.of(StringUtils.split(value, ",")) .collect(Collectors.toList()); } } -
新建configure目录,新建自动配置类
@Configuration @ConditionalOnClass(value = { ISplitService.class, SplitServiceImpl.class}) public class SplitAutoConfigure { @Bean @ConditionalOnMissingBean ISplitService starterService() { return new SplitServiceImpl(); } } -
在resources文件夹下,新建META-INF文件夹,添加配置类
spring.factories# 类似key = value的键值对形式 org.springframework.boot.autoconfigure.EnableAutoConfiguration=com.imooc.springboot.configure.SplitAutoConfigure -
在terminal中,输入如下指令实现编译打包
$ mvn clean install -Dmaven.test.skip=true
11. 使用脚本管理springboot项目
-
在resources下新建start.sh文件
#!/user/bin/env bash nohup java -jar zth-spring-boot-study.jar & -
关闭应用脚本 stop.sh
#!/user/bin/env bash
pid = `ps -ef | grep zth-spring-boot-study.jar | grep -v grep | awk '{print $2}'`
if [[ -z "${pid}" ]]
then
	echo application is already stopped
else
	echo kill ${pid}
	kill -9 ${pid}
fi